ShopDreamUp AI ArtDreamUp

Deviation Actions


Description
Hey, so I decided to do a step-by-step explanation of what goes into making a comic page, in my personal experience. Note, I don't work with a publisher, so this is likely to be a lot different for people who do! This is just so you can know what my own process is, and possibly learn from it if you like it.
1. Actually, I start by doing novel-format. I write the entire story, scene by scene as a NaNoWriMo novel. For me, this makes it easier to translate it into a script, because I have already got the locations, scene order, and a lot of the dialogue done. I can make tweaks to it to make it work better in a page by page format, but when I do the script I only have to worry about the visuals, not the story. My novel is well ahead of the script, though it constantly fluctuates to account for editing, scene order changes, and new plot developments
2. As I said, stage 2 is translating it into a script. I use Celtx's "comic" format, which inserts page and panel breaks for you when you hit return. It saves a lot of time and effort that might have been spent writing those manually, plus it has an export to PDF option that breaks it into panels and pages in one column with dialogue in the other, making it easy to read intuitively. I don't have a picture of that, but trust me, it's nice. I currently have 5 chapters of script written, which should last me a couple of years (sadly). In the meantime, I work to improve the script as much as possible.
3. When I've caught up to any given page of script, I begin drawing the page. First, since page 27 is an odd number, I open up a file I have called "right.psd". This is just a file that has the proper resolution and guidelines for margins for a right page. the left is different because the margin at the fold is a tiny bit wider than the ones on the edges. This is for when I have enough pages to print. They get cut off in the web version because at the smaller size I want to make the most of the space.
4. I block out the layout, caring mostly about only the frames, but making little stick figures to show what's supposed to be in them
5. I make a new document for each frame and make refined sketches from there. This doesn't really serve any purpose compared to just drawing directly on the page, except it allows me to keep track of all the layers for each frame separately, since I have PSE, which doesn't have layer groups.
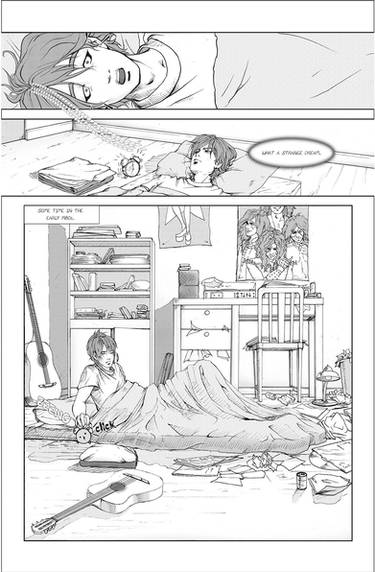
6. I finish the lineart and coloring like a good little artist.
7. I "copy merged" the whole frame and paste it in like a sticker. There are probably better ways to do this, I'm sure this has downsides when it comes to color-coordinating panel to panel, but hey, it's how I do it.
8. Finish all the frames and paste 'em in
9. Shrink the page down to web sized and add word bubbles. I make my word bubbles with the lasso tool (circle version), fill them with white and use "stroke" in black to make the line around. Usually if the bubble needs a tail, I just do it in white over the black line. I've found that easier than stroking around the tail too, which usually ends up looking bumpy. Also, I like my word bubbles to be about 83% opacity so you can sort of see through them.
And that's all! I don't know why I made this, maybe just because I was curious to see what it all looked like laid out. Anyway, maybe someone will enjoy it ^_^
1. Actually, I start by doing novel-format. I write the entire story, scene by scene as a NaNoWriMo novel. For me, this makes it easier to translate it into a script, because I have already got the locations, scene order, and a lot of the dialogue done. I can make tweaks to it to make it work better in a page by page format, but when I do the script I only have to worry about the visuals, not the story. My novel is well ahead of the script, though it constantly fluctuates to account for editing, scene order changes, and new plot developments
2. As I said, stage 2 is translating it into a script. I use Celtx's "comic" format, which inserts page and panel breaks for you when you hit return. It saves a lot of time and effort that might have been spent writing those manually, plus it has an export to PDF option that breaks it into panels and pages in one column with dialogue in the other, making it easy to read intuitively. I don't have a picture of that, but trust me, it's nice. I currently have 5 chapters of script written, which should last me a couple of years (sadly). In the meantime, I work to improve the script as much as possible.
3. When I've caught up to any given page of script, I begin drawing the page. First, since page 27 is an odd number, I open up a file I have called "right.psd". This is just a file that has the proper resolution and guidelines for margins for a right page. the left is different because the margin at the fold is a tiny bit wider than the ones on the edges. This is for when I have enough pages to print. They get cut off in the web version because at the smaller size I want to make the most of the space.
4. I block out the layout, caring mostly about only the frames, but making little stick figures to show what's supposed to be in them
5. I make a new document for each frame and make refined sketches from there. This doesn't really serve any purpose compared to just drawing directly on the page, except it allows me to keep track of all the layers for each frame separately, since I have PSE, which doesn't have layer groups.
6. I finish the lineart and coloring like a good little artist.
7. I "copy merged" the whole frame and paste it in like a sticker. There are probably better ways to do this, I'm sure this has downsides when it comes to color-coordinating panel to panel, but hey, it's how I do it.
8. Finish all the frames and paste 'em in
9. Shrink the page down to web sized and add word bubbles. I make my word bubbles with the lasso tool (circle version), fill them with white and use "stroke" in black to make the line around. Usually if the bubble needs a tail, I just do it in white over the black line. I've found that easier than stroking around the tail too, which usually ends up looking bumpy. Also, I like my word bubbles to be about 83% opacity so you can sort of see through them.
And that's all! I don't know why I made this, maybe just because I was curious to see what it all looked like laid out. Anyway, maybe someone will enjoy it ^_^
Image size
1800x2433px 2.76 MB
© 2012 - 2024 bribble
Comments0
Join the community to add your comment. Already a deviant? Log In